How to Find Mac Address in Windows 10?
Mac addresses are linked to the hardware of network adapters. A mac address provides a unique hardware address or physical address for every node on a lan or other network 3) use control panel to find the mac address. Step 1: at first open the control panel, then “network and internet” and then go to the “network and sharing step 2: type or simply copy and paste the following command in the command prompt and hit enter. Getmac /v / fo list or getmac/v always maintain the spaces. …
What is MAC address?
A Mac or Media Access Control address which is assigned to a network interface controller is a unique identifier.
Mac addresses are linked to the hardware of network adapters.
Mac addresses are used in the sub layer of the data link layer.
Mac address sometimes referred to as burned-in-address or Ethernet hardware address.
An example of a Mac address for an Ethernet NIC: 00:0a:95:9d:68:16.

What is the purpose of a Mac address?
Mac address provides a unique hardware address or physical address for every node on a LAN (Local Area Network) or other network.
Mac addresses are generally permanent, but it can be changed. Mac addresses are 12 digit hexadecimal numbers and written in MM:MM:SS:SS:SS format.
How to find Mac address on Windows 10?
There are some methods that you can use to find your Mac address on Windows 10. Now take a look on these methods below –
1) Use Command Prompt to find the Mac address
Step 1: Go to the Command Prompt
By clicking on your Windows Start menu in the bottom left corner of your screen you can find Command Prompt. Then type “Command Prompt” in the search bar and click when it pops up.
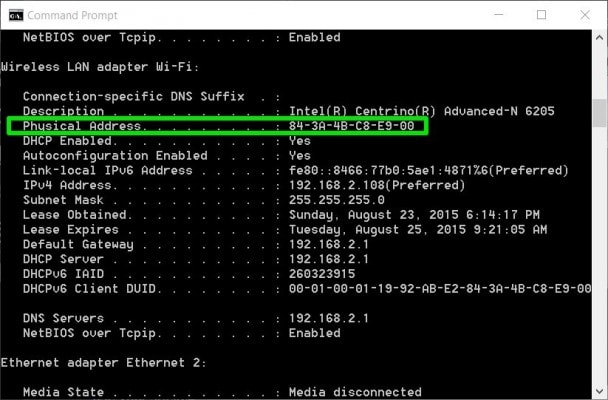
Step 2: Type in ipconfig and click Enter
Type the following line or simply copy and paste the following command
Ipconfig /all
One thing you have to observe that there is a space between the g and the slash and after typing this, hit Enter.
Step 3: Under Physical address find your Mac address
Search for “Physical Address “from the lots of information you will see. You will see. You have to copy and paste that line in your Mac address, if needed.
2) Use Network Settings to find the Mac address
It is a very simple method like command prompt, but takes few more steps than the command prompt method.
Step 1: Select the “Network Settings” by clicking on your network icon
The network icon looks like single wave and is at the bottom right corner. Select “Network and Internet Settings” from the menu that appears.
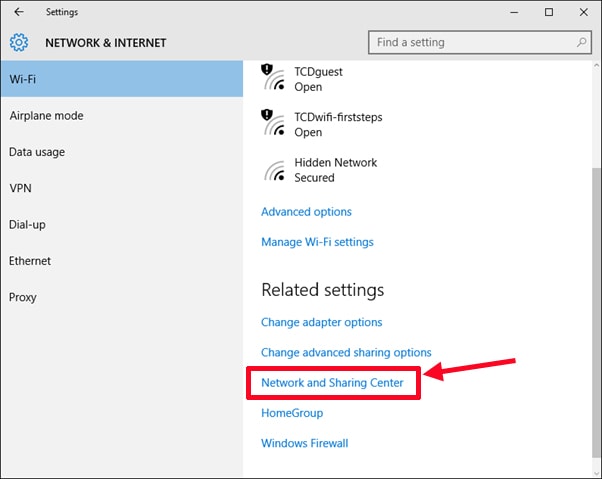
Step 2: Click on “Network and Sharing Center”
After finishing the step 1, a window will appear, click on the “Network and Sharing Center” at the bottom of the screen.
Step 3: Find your Wi-Fi connection
Find your connection from the appearing window. You can see the name of your Wi-Fi and click on that.
Step 4: Select “Details…”
Select the “Details…” button from the Wi-Fi status pop-up window.
Step 5: Under physical address find your Mac address
This step is same as the previous command prompt step. In the “Physical Address” field you will find your Mac address.
3) Use Control Panel to find the Mac address
Using Control Panel you can find the Mac address of a network adapter.
Step 1: At first open the Control Panel.
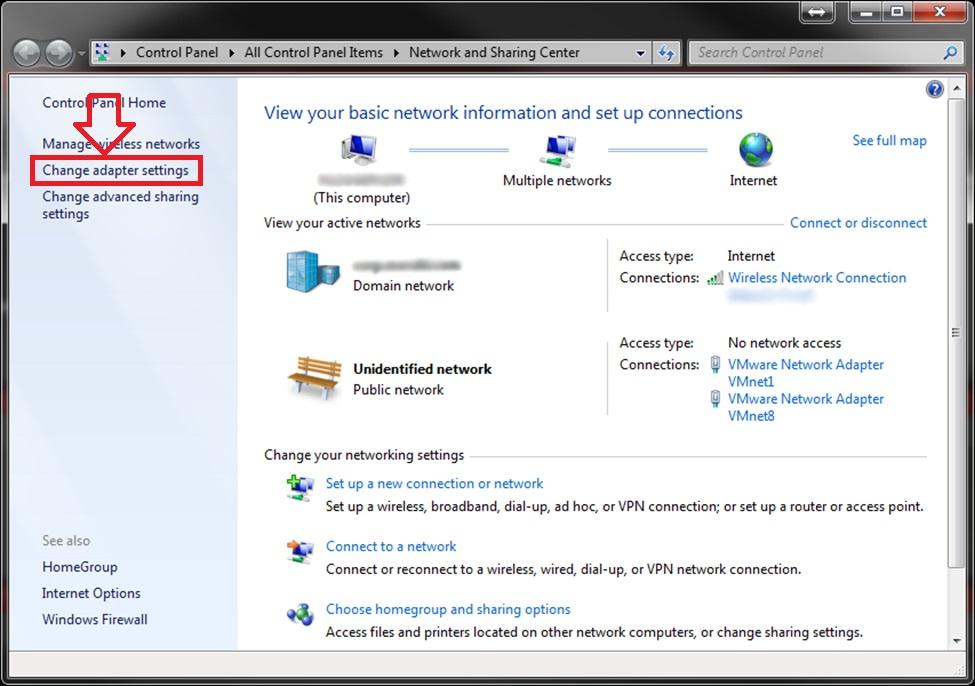
Step 2: Go to the Control Panel, then “Network and Internet” and then go to the “Network and Sharing Center”.
Step 3: At the top left side of the window, click on the link “Change Adapter Settings”.
Step 4: If you want to see the Mac address, double click on the network adapter connection.
Step 5: Then click on the “Details” button from the connection status window.
Step 6: The properties of the Physical address is the Mac address of your selected network adapter.
4) Use PowerShell to find the Mac address
Step 1: First open the PowerShell.
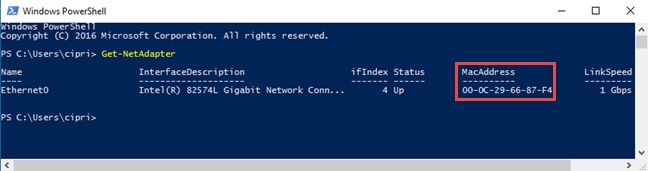
Step 2: Type the following command or simply copy and paste it in the PowerShell.
get-netadapter
Step 3: After getting the output, you can see the Mac address column and this is the Mac address you want.
5) Use Wi-Fi Adapter in settings to find the Mac address
Step 1: Open Settings on your desktop or laptop and then click on the “Network & Internet” icon.
Step 2: Click on the “Wi-Fi” on the left side of the Settings window and then click on the “Hardware Properties”.
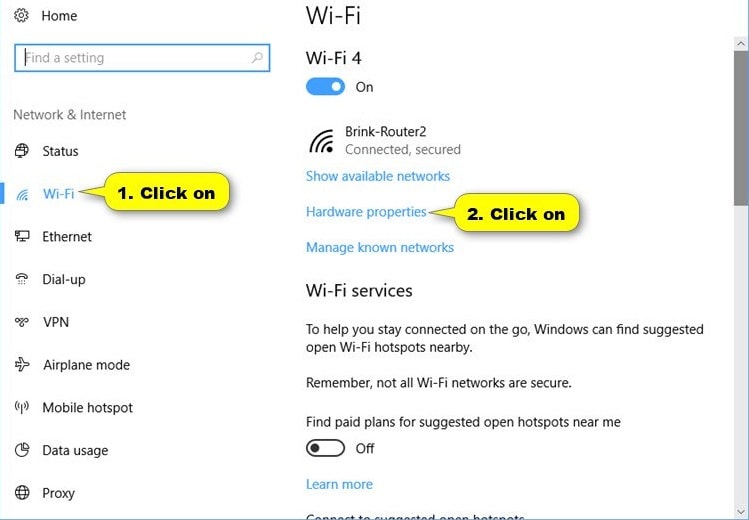
Step 3: Now you can see the Mac address of the Wi-Fi adapter on the properties of the physical address on your PC.
6) Find the Mac address of Ethernet Adapter in settings
Step 1: Open Settings on your desktop or laptop and then click on the “Network & Internet” icon.
Step 2: Click on the Ethernet on the left side of the settings window and then click on the list of the Ethernet adapter name which you want under Ethernet.
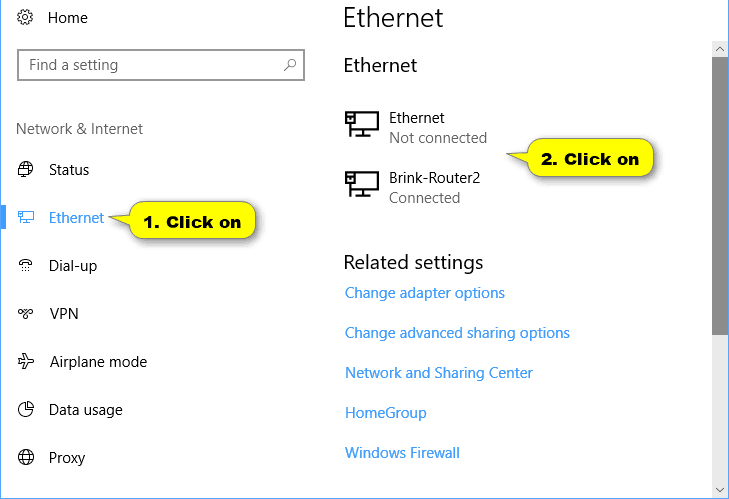
Step 3: Now you can see the Mac address of the Ethernet adapter on the properties of the physical address on your PC.
7) Use Getmac command in command prompt to find the Mac address
Step 1: Open a command prompt first.
Step 2: Type or simply copy and paste the following command in the command prompt and hit Enter.
getmac /v / fo list
Or
getmac /v
Always maintain the spaces otherwise it will not work properly.
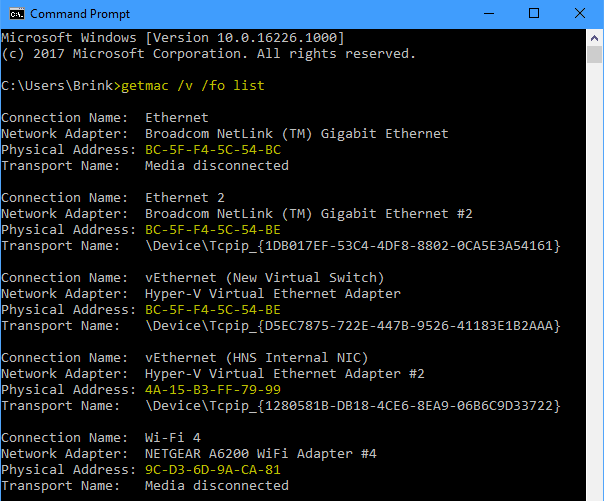
Step 3: After that, you can see the Mac address of all the network adapters on your PC.
Conclusion
These are the processes which will help you to find the Mac address in your Windows 10.
I think my article will help you.
Here I have discussed everything in detail.
Please follow the instructions carefully.
Are you facing any problem to find the Mac address after reading this article?
I’m sure that you will not face any more problems.
So do it.

Hello! My name is Lucas, and I am the creator of ursuperb.com. I’ve been writing about technology for almost 10 years now, and I love talking about tech news, reviews, and tutorials. I’m currently living in San Francisco, CA, and I’ve been blogging professionally since 2012. I love what I do, and I really enjoy interacting with people online. I believe in creating positive change for humanity, and I try to inspire others to do the same. You can read more about me here.
My favorite thing about Ursuperb is that I’m able to provide useful information to anyone interested in learning more about technology. No matter what kind of tech you use (computer, smartphone, tablet), you will definitely find something interesting to read on Ursuperb. So, let’s take a look at some of the topics I cover on Ursuperb:
1) How To Build An Online Business With WordPress
2) How To Make Money On YouTube Using AdSense
3) What Is Google Analytics? And Why Should You Use It?
4) How To Make Your Own Website Design Software For Free