How to fix Missing option “Like what you see?” in Windows Spotlight ?
Windows spotlight is an element included naturally in windows 10 that downloads pictures and advertisements consequently from bing and displays them when the lock screen is being appeared on a pc running windows the most effective method to configure and use system restore in windows 10 part 1 – enable system protection 1. Press win + r and type rstrui in the run dialog box fix 3 – delete windows content delivery settings folder this is the fix that has worked for many individuals out there and performing this fix is simple too. You should simply open windows 10 users may have noticed that the “like what you see?” option is missing from the “windows spotlight” screen. This is rather annoying at times, but there. …
Windows Spotlight is a nifty feature in Windows 10 that can come really handy to those who use Windows 10 PC’s in the office. As you know, Windows Spotlight is that feature that automatically move to a new wallpaper, which can be quite cool and actually useful if you like to have a different wallpaper every day.
However, there is a small problem with that feature, which is the missing option called “Like what you see?”. For those who don’t know, this option is used to make changes regarding the Windows Spotlight even if you don’t like the current wallpaper.
Windows Spotlight is an element included naturally in Windows 10 that downloads pictures and advertisements consequently from Bing and displays them when the lock screen is being appeared on a PC running Windows 10.
We as a whole realize that Windows Spotlight highlight displays excellent wallpapers on your lock screen and changes with new wallpaper ordinary.
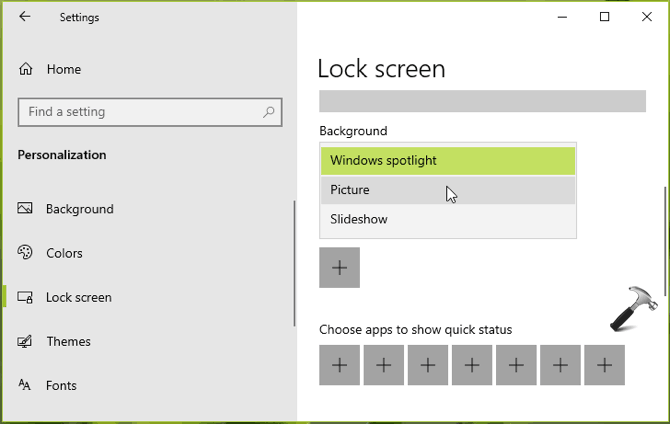
In case you’re on Windows 10 Version 1511 or later, you can empower this element from the Settings app > Personalization > Lock Screen.
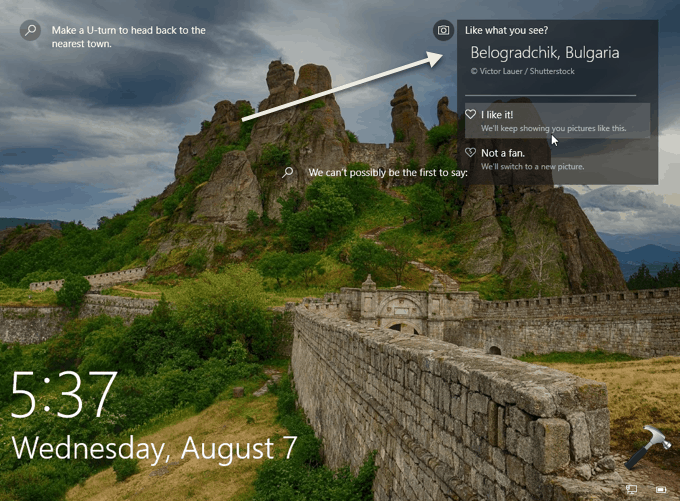
At the point when you see Windows Spotlight wallpaper on the lock screen and float cursor over this wallpaper, you’ll spot ‘Like what you see’ option.
Clicking this option gives you the pathway to get comparable sort of wallpaper or deny, in the event that you don’t like the wallpaper. In the event that if ‘Like what you see’ option is absent for you, here is the manner by which to restore it back.
How to Resolve ‘Like What You See’ Missing For Windows Spotlight
FIX 1 – Via Lock Screen Options
1. Right-click Start Button or press Win + X keys and select Settings.
2. In the Settings app, explore to Personalization > Lock screen.
3. Presently in the right pane of the Lock screen, under Background, set the option to Picture. At that point restore back this option to Windows Spotlight once more.
4. Press Win + L keys and check if ‘Like what you see’ option is restored now.
In the event that issue still perseveres, see FIX 2 underneath.
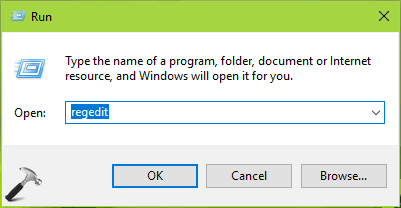
FIX 2 – Via Registry
It is strongly prescribed that you create a System Restore point first before altering the registry. The most effective method to Configure And Use System Restore In Windows 10
Part 1 – Enable System Protection
1. Press Win + R and type rstrui in the Run dialog box, click OK or press Enter key.
2. In the System Restore window open straightaway, you’ll see the message that no restore points have been created on your PC’s system drive. To create a restore point open System Protection. Consequently, click on the system protection interface there.
3. Presently in the System Properties window, select your system root drive under Protection Settings heading. At that point click on the Configure button. If it’s not too much trouble note that atm the System Restore and Create button here are turned gray out.
4. In the System Protection window for chose drive, select Turn on System Protection option. Click Apply pursued by OK.
Along these lines, we have configured System Protection which thusly lets the system create restore points naturally. You’ll see that the grayed buttons in the window appeared in stage 3 likewise gets dynamic. Presently how about we see how to create a restore point physically.
Part 2 – Creating a System Restore Point
1. Click on the Create button in System Properties window appeared in stage 3 of PART 1. At that point give a name to the restore point which you’re making now and click Create. We prescribe you to utilize such a name, we will push you to effectively perceive the restore point later.
2. In a couple of seconds minutes, you’ll get The restore point was created effectively message. Click Close.
By means of Registry
1. Press Win + R and put regedit in the Run dialog box to open Registry Editor (in the event that you’re curious about Registry Editor, at that point click here). Click OK.
2. In the left space of Registry Editor window, explore to the following registry key:
HKEY_CURRENT_USER\SOFTWARE\Microsoft\Windows\CurrentVersion\Lock Screen\Creative
3. In the right sheet of the Creative registry key, double-tap on LockImageFlags registry DWORD (REG_DWORD) to alter its Value information.
4. Presently change the Value information from 1 to 0 and click OK. Close Registry Editor and reboot.
Subsequent to restarting your system, the issue must be settled.
FIX 3 – Re-register Windows Spotlight
In the event that on the off chance that FIX 1 and 2 can’t take care of your problem, you would then be able to attempt to re-register the Windows Spotlight feature.
In the event that you need to reinforcement previously displayed Windows Spotlight pictures, you ought to do it before you perform beneath the mentioned steps. Since subsequent to experiencing these steps, those pictures and related content of Windows Spotlight will be deleted for sure.
1. Open administrative Command Prompt.
2. Type or glue the following command and press Enter key:
DEL/F/S/Q/A “%USERPROFILE%/AppData\Local\Packages\Microsoft.Windows.ContentDeliveryManage
3. Once the previously mentioned command executed, type in another comparative command and hit Enter key:
DEL/F/S/Q/A “%USERPROFILE%/AppData\Local\Packages\Microsoft.Windows.ContentDeliveryManager_cw5
Once this command execution is effective, close Command Prompt.
4. Open Windows PowerShell and type in or glue following cmdlet and press Enter key at that point to execute it:
Get-AppxPackage – Name Microsoft.Windows.ContentDeliveryManager | Foreach {Add-AppxPackage – DisableDevelopmentMode – Register “$($_.InstallLocation)\AppXManifest.xml” – Verbose}
Close Windows PowerShell and reboot your machine. Subsequent to restarting the machine, select Windows Spotlight against Background for your Lock Screen, under the Settings app. We’re pretty sure that this time Windows Spotlight will function as you anticipate from it.
FIX 4 – Delete Windows Content Delivery Settings Folder
This is the fix that has worked for many individuals out there and performing this fix is simple too. You should simply open the Packages organizer in the AppData directory and afterward open the Windows Content Delivery envelope to delete the settings. This may sound somewhat complex yet it really isn’t. Simply pursue the steps recorded beneath and you will be done right away.
- You need to initially know your PC’s username and so as to do that, open the Command Prompt and utilize the ‘whoami’ command to know your username.
- After you know your username, simply open the Windows Run box by pressing the keyboard combination Windows Key + R and afterward enter the following way.
- C:\Users\<USERNAME>\AppData\Local\Packages\
- Once you are in this envelope, look for an organizer named: Microsoft.Windows.ContentDeliveryManager_<somerandomcharacters>
- Open the envelope and afterward look for the Settings organizer.
- Now, leave this window opened and afterward open the Windows 10 Settings app by clicking on the Start Menu and afterward clicking on the gear icon.
- Navigate to Personalization and afterward switch to Lock Screen.
- From the Background drop-down menu, you need to change the setting from Windows Spotlight to Picture.
- Now limit this window and open the Windows Content Delivery organizer window.
- Permanently delete the Settings organizer in this window.
- Switch back to the Lock screen Personalization Settings window and pick Windows Spotlight starting from the drop.
Once this is done, you simply need to restart your PC and you will see that the issue is currently gone and Windows Spotlight is working immaculately once more.
REFERENCES
As a Windows 10 user, you may have noticed that the “Like what you see?” option is missing from the “Windows Spotlight” screen. That is a bummer, since you might see something interesting and want to flag it for later, but you cannot get to it. This is rather annoying at times, but there is a way you can fix this problem.
https://superuser.com/questions/1272949/how-can-i-display-like-what-you-see-at-windows-login

Hello! My name is Lucas, and I am the creator of ursuperb.com. I’ve been writing about technology for almost 10 years now, and I love talking about tech news, reviews, and tutorials. I’m currently living in San Francisco, CA, and I’ve been blogging professionally since 2012. I love what I do, and I really enjoy interacting with people online. I believe in creating positive change for humanity, and I try to inspire others to do the same. You can read more about me here.
My favorite thing about Ursuperb is that I’m able to provide useful information to anyone interested in learning more about technology. No matter what kind of tech you use (computer, smartphone, tablet), you will definitely find something interesting to read on Ursuperb. So, let’s take a look at some of the topics I cover on Ursuperb:
1) How To Build An Online Business With WordPress
2) How To Make Money On YouTube Using AdSense
3) What Is Google Analytics? And Why Should You Use It?
4) How To Make Your Own Website Design Software For Free