How to resolve “Could not find this item – this is no longer locate in the path- verify the location and try again”
This common error will be displayed when you are trying to access a certain file either to delete, rename, or open it. If you can discover and view a file try out this method but be sure you type the correct path instead of our placeholder. Look for “command prompt” in the start menu or by clicking the search button just next each command is in a new line so press enter after you type in. Ensure that you must have written the current name and the new name of the file separated by a space if you don’t like command prompt then this can be the feasible option for you. Follow the procedure as provided: give the location of the error raising file or folder on your computer. …
There is hardly any person in this tech world who has not seen this error: “Could not find this item. This is no longer located in the specified folder. Verify this location and try again”; Well, this happens to us very often when we want to delete some file or explore any file and manipulate it.
This was a; you can call it strange or weird problem because one did not be knowing if the file actually exists or not. Had been deleted already? And why my Windows is showing the file located in that folder if it really was not there? Kind of made me wonder if my laptop or hard disk was functioning properly or not.
This common error will be displayed when you are trying to access a certain file either to delete, rename, or open it. Practically speaking, if you can discover and view a file on your pc then you should also have clear access to it. However, this unusual error occurs and you could not find any reason for that.
Moreover, this happens with files to be created using third-party services and it generally happens because the extension of the file is not properly defined. There are some other unseen causes as well. Given below are some solutions or you can call them ultimate tricks to overcome this situation. So, go ahead with these tips & tricks to avoid the error.
Tip no 1.
F5 to Refresh
The first & foremost thing to is to simply press F5 while viewing the folder in Explorer. F5 refreshes the current display and if it was stuck for any reason, then there is a probability they have not been loaded correctly. So F5 simply refreshes the directory. If F5 doesn’t work, you may try to restart the computer once and check out that it has removed the previously deleted files.
Apart from that, the next thing to look at is the availability of RAM you have on your system. If there are numerous RAM intensive applications running at the same time, this problem has been seen to occur often.
So a simple solution is to try closing a few applications, programs, etc. and press F5 to refresh the current folder.
Tip no 2.
Use the below-given Command to Delete the error raising File
This is one of the commands which can be used to delete the file or folder in which the error has occurred. Deleting it may be necessary if it is linked to software that you uninstalled a few days ago, especially if the software files takes up huge space on the disk. Try out this method but be sure you type the correct path instead of our placeholder.
- Look for “Command Prompt” in the Start menu or by clicking the search button just next to it, have a right-click on it, and open it with “Run as administrator” option. One can also use the Windows Key + R key shortcut for run command and type cmd in the Run dialog box to open it.
2. Copy & paste the command given below in the command prompt and ensure that you pressed the Enter key thereafter. Also, make sure to use the correct file path including its name. X is the placeholder letter i.e. you should input the letter to the drive’s letter where the file is placed.
rd /s ?X:badfolderpath
3. You will get the Operation completed successfully message on the display. If you don’t check to see if you have input the file’s location correctly. If you have, try checking out other solutions below.
A Command Prompt Twist to Rename the Folder and get it run normally
As in many cases, it is important files that cause an error, so you can rename it using commands to a non-problematic name and encounter it with a normal way by exploring it via Windows Explorer. To ensure any further confusion follow the commands given below:
- Look for “Command Prompt” in the Start menu or by clicking the search button just next to it, have a right-click on it, and open it with “Run as administrator” option. One can also use the Windows Key + R key shortcut for run command and type cmd in the Run dialog box to open it.
- Type in cd (command used to change current directory) with the path file in the format C:Folder1Folder2Folder3.You need to forget about the error raising file. In other words, the last folder in the command should be the folder where the error raising file is placed.
cd C:Folder1Folder2Folder3
3.Press Enter after this command. Use the following set of commands which will be displayed below. Each command is in a new line so press Enter after you type in or copy each line:
DIR /A /X /P
RENAME (present name of error raising file) (new name)
EXIT
- Ensure that you must have written the current name and the new name of the file separated by a space. Please note that don’t write the brackets in the command because it may cause an error. If everything runs fine, then you can access the file without any difficulty.
Create Temporary Folder
The next thing you can give a try or can be considered as hit & trial is to create a new folder, drag the files into the new folder from the old problematic folder and then try to delete that newly created folder with the files in it. In fact, for any reason, moving the files from their current folder looks like to make them delectable one more time.
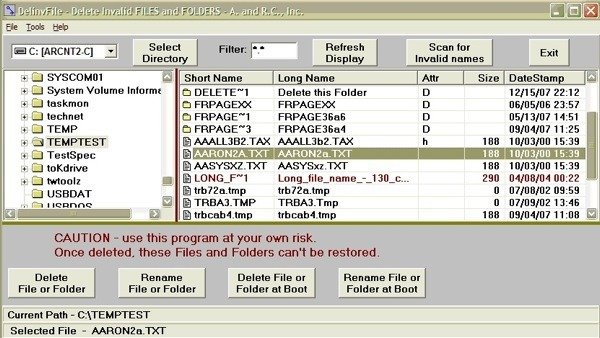
Use DelinvFile Tool
If anything else didn’t work then this will surely delete the file, you can use a free tool called DelinvFile that just deletes invalid files in Windows 7/8/10 operating system.
File without Any Extension
This is the method which works in scenarios where the error raising file does not have a supportable extension i.e. Windows did not know how to deal with it and it displays the error message. The situation occurs with files made by browser plugins (Mozilla Firefox, Chrome etc.). So, here is a solution to those files:
- Follow steps 1 and 2 from the solution above (used before to reach through the file in the directory) in order to correctly discover to the file’s location. Always be careful while giving the folders.
- Press Enter after the command was typed, to execute it and use the syntax one in order to delete the error raising file with the error :
del *.*
Check file explorer to verify that file has been deleted or not.
Checking the hard drive for any corruption or crash
-
- Look for cmd in the start menu or using run command.
- Right-click on it and choose Run as administrator.
- Type chkdsk /p and hit Enter. This will start scanning the drive
- Type chkdsk c: /f /r. This will be exchanging the distorted elements.
Without using Command Prompt
If you don’t like command prompt then this can be the feasible option for you. It seems like a typical workaround but if this works no one option is better than it. So better try this one out and get rid of unusual problems. Follow the procedure as provided:
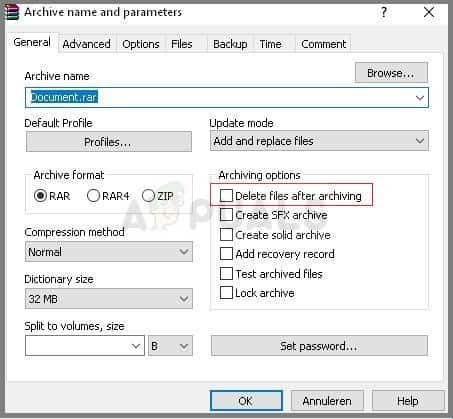
Give the location of the error raising file or folder on your computer by navigating to it in the File Explorer. Have a right-click on it and select the Add to archive option from the given menu.
Next to do is when the archiving options window opens, give the location to the Delete files after archiving option and ensure you choose it. After that, click OK to start the archiving process and, when it is finished you would notice that the file is missing! Deleted successfully !!
At the last delete the archive you have created with right-clicking on that and selecting the Delete option from the given menu. Then your work is over.
Conclusion:
Many of us face this common error but often get irritated when it does not resolve. It simply wastes our time and sometimes some important files are lost due to it.
These were some simple tweaks that need to be followed to delete a file that gives error raising message. Hope these simple commands & solutions will offer you great help. Thanks for reading this article and let us know if you have another solution to this problem. Thank you!!

Hello! My name is Lucas, and I am the creator of ursuperb.com. I’ve been writing about technology for almost 10 years now, and I love talking about tech news, reviews, and tutorials. I’m currently living in San Francisco, CA, and I’ve been blogging professionally since 2012. I love what I do, and I really enjoy interacting with people online. I believe in creating positive change for humanity, and I try to inspire others to do the same. You can read more about me here.
My favorite thing about Ursuperb is that I’m able to provide useful information to anyone interested in learning more about technology. No matter what kind of tech you use (computer, smartphone, tablet), you will definitely find something interesting to read on Ursuperb. So, let’s take a look at some of the topics I cover on Ursuperb:
1) How To Build An Online Business With WordPress
2) How To Make Money On YouTube Using AdSense
3) What Is Google Analytics? And Why Should You Use It?
4) How To Make Your Own Website Design Software For Free