What is”WSAPPX”? || High Disk CPU Usage Problems Solution
ByJohnUpdated on
Short Notes: Wsappx. Exe is a process that belongs to the windows live application platform. It is responsible for installing, uninstalling, and updating windows store apps. Wsappx sometimes consumes so much cpu and disk resources in the background. On windows 10, clipsvc provides many essential services that keep the apps running properly. Wsappx will not consume cpu and disk space anytime but will do whenever you want it to do it. If you are using any of the windows store apps that come wsappx is important to service introduced in windows 8 to help to install, uninstall and update windows store apps. They also help in running these apps. They will consume high cpu you never can use 100% ram personally. You can just go to task manager by pressing ctrl+ alt+ del. This is the cause of unwanted lagging. Windows search: windows search was initialized to make the user’s work easy and quick. But at the same time, it keeps running in the background and decreases ram speed. You may these articles relevant what is “windows audio device graph isolation”? (lucid explanation) what is desktop window manager (dwm. Exe). …
What is WSAPPX? How to fix Wsappx high disk cpu problem?
Wsappx.exe or Wsappx.dll high CPU usage is a process that is used for Windows Live application platform.
It has been identified that the wsappx.exe is a process that belongs to the Windows Live Application Platform. If your computer is running slow and you have more than one processor, then you may want to disable the Wsappx.exe CPU hog.
You may have seen ‘wsappx’ process in Windows 8 and 10.
Also, you might have observed that its consuming a high amount of CPU and Disk resources.
We will cover ‘wsappx’ in-depth and resolve every problem related to it. Such as wsappx disk usage and CPU usage.
Basically, its a process related to Windows Store and Microsoft’s new ‘Universal’ app platform.
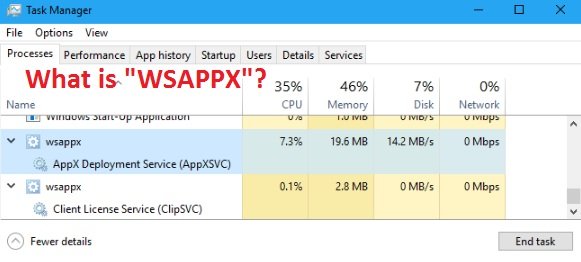
wssappx is composed of two separate background processes which provide various System services and are very important. wsappx includes the AppX Deployment Service(AppXSVC) in both Windows 8 and 10.
But on Windows 10 you will also see the Client License Service (ClipSVC).
And on Windows 8 you will also see a process the Windows Store Service(WSService) in place of ClipSVC.
What exactly ‘wsappx’ does?
It handles:
Installing
Uninstalling
Updating
of Store apps and also ensures that they are properly licensed.
Based on your Operating System you will find 2 sub-services associated with wsappx process. You can view it by expanding the wsappx process in Task Manager.
Lets now see, each of these sub-services more clearly.
What is AppX Deployment Service(AppXSVC)?
It is responsible for deploying Store apps. All “Universal Windows Platform” apps are distributed under “.AppX packages”, therefore the name.
Also, we can say that this service is responsible for installing, uninstalling, and updating Windows Store Apps. All the updates of apps related to Windows Store are done automatically by this service. There are many apps that fall under these categories which are as follows:
Traditionally all Windows User Apps use CPU and disk whenever they are installed, uninstalled or are updated.
But when we talk about Windows Store Apps, all resources consumed for installing the App or uninstalling or removing the App are shown by into AppXSVC Subservice under wsappx instead of that individual program.
Why is “wsappx” taking so much CPU and Disk Resources?
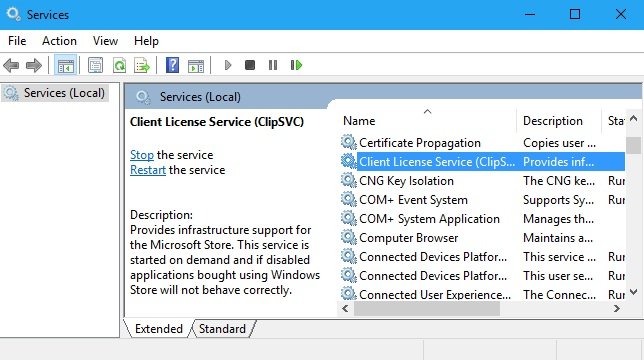
If you disable ClipSVC then apps will not behave as expected and can crash at any time.
Several of the services provided by ClipSVC are:
It performs license management of Store apps to check whether you have purchased the software or not. This is done for providing Anti-piracy in Apps.
It will check whether the updates are available for the app and will notify the user?
There are many functions done by ClipSVC but Windows haven’t described it clearly so we can assume that its very important process for keeping our Windows Store Apps running properly.
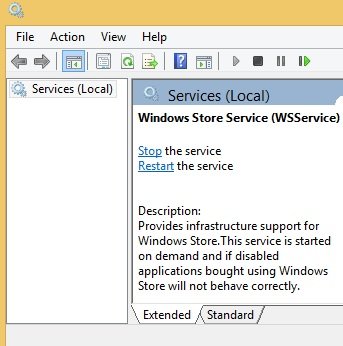
What is “Windows Store Service (WSService)” in Windows 8?
Its functions are the same as ClipSVC in Windows 10. It also provides services that are essential for the proper running of Windows Store Apps. ClipSVC and WSService have the same descriptions by Windows in Service interface. This tells they are same services using different names in different versions of Windows OS.
You will not see the WSService process in Windows 10 and you will not see ClipSVC in Windows 8.
Why “wsappx” is consuming so much CPU?
The wsappx services will consume a significant amount of CPU if you are installing, uninstalling, or updating Store apps. As you have chosen them to install or uninstall, so in the background it will install and thereby consuming CPU resources.
If you haven’t chosen to install or uninstall any app and then also CPU is consumed that means Store apps are being automatically being updated. So in the background, while updating the apps wsappx will consume CPU and Disk Resources.
However, you may not like sudden slowing down of PC because of automatic updating of Store Apps. Then you can turn off the “Automatically Update Store Apps” option.
To disable Automatic Updates, do the following steps:
Launch the Windows Store
Click on User Icon on Top Right corner
Go to Setting from the menu that appears
Then, select Update Apps Automatically option and turn it OFF.
If you want to manually Update your Apps
Then:
Goto Windows Store
Click on the User Profile icon at the top right corner
Select the “Downloads and Updates” option
It will show you if any updates are available for installed Windows Apps.
Select the App for which you want to update and install the updates.
By doing this wsapp will not consume CPU and Disk Space anytime but will do whenever you want it to do it.
But if you are using any of the Windows Store apps that come with Windows OS pre installed such as Mail, Movies, TV, Photos, OneNote or Calculator, then turning off automatic updates is not recommended. As updates are very frequent for these apps therefore in order to get the best features and proper running of these apps “Automatic Updates” should be turned on.
Can ‘WSAPPX’ be disabled?
Now you have understood its importance, then you would have realized that it’s not possible for you to disable it. wsappx will not be running all the time but whenever needed then only it will run in the background.
To notice this, just launch any Store App such as Music, then you will see ClipSVC process in Task Manager. If you launch Window Store then AppXSVC will start running. Whenever you install or uninstall any app then also AppXSVC will run in the background, therefore, consuming system resources such as CPU and Disk Space.
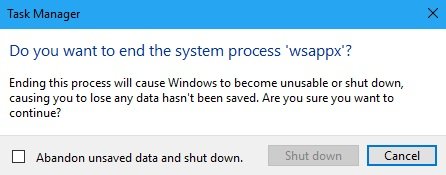
If you forcibly try to kill ‘wsappx’ process from Task Manager then it will warn you that its a system process and ending it will cause System to become unstable or will shut down.
Therefore,
There is no way to forcibly kill ‘wsappx’ process.
Hope you would have understood the importance of ‘wsappx’ and there is no reason to disable it.
Although you can prevent it from automatically running in the background by turning off automatic updates.
However, there is not virus till now which creates a process named ‘wsappx’ and does the dirty job.
If you feel your computer is not running effectively even after the methods described above then it’s best to Scan your Computer for Viruses using a Good Antivirus Program.
Conclusion
WSAPPX is important to service introduced in Windows 8.1 to help to install, uninstalling and updating Windows Store apps. They also help in running these apps. They will consume high CPU and Disk Space for some time only, therefore no need to worry if sometimes they consume it.
Hope you enjoyed reading the articles,
Feel free to comment below your view and suggestions.
How to solve high Disk CPU usage problem in Windows
Hello Geeks! Welcome back. Here we are off with a new topic. Today’s topic is going to be based on your daily problem and its solution. We are going to discuss the high CPU usage problem. Many windows users are getting irritated by it. So, we’ll see and find the best possible solution.
What is high Disk CPU usage?
So, you might have already come across this question. And some of you might have also Googled it. Don’t worry if you don’t quite understand it; we will discuss it completely. High Disk space usage is something related to your system’s RAM. So, before diving deep let’s find out what actually RAM does.
RAM stands for Random Access Memory. It’s said to be a volatile memory as data is lost once switch the PC off. Yes, you were right those Couple of Green rectangular chips are RAMs.
So, the main functionality of RAM is to temporarily store data and instructions for the processor to process it. When you switch on the PC the OS is loaded in RAM and the Windows screen pops up. At the same time, many more essential system programs get loaded here. Then when you open different applications like WORD, PAINT, GAMES, etc all this application’s necessary data is loaded in RAM.
So the maximum data loaded defines the size of your RAM.
That means your 8 GB of RAM can load 8 GB of programs simultaneously. Well not actually, as some part of the system is already reserved by OS and system software. The remaining Disk space can be useful for you. In fact, you never can use 100% RAM personally. So, when you install a bunch of new applications in the system; they all have some services and threads which keep running in the background.
So, more the number of apps installed less the available RAM. You can just go to Task Manager by pressing Ctrl+ Alt+ Del, and find much memory is free and which apps are using how much RAM. If you find the usage percentage high; chances are that it may slow your system down. This is the cause of unwanted lagging. If it reaches 100% your system might crash or freeze.
What are the solutions?
So, we have seen what actually causes high disk space utilization. Now we will look to find out the best solutions. Here will look after each culprit app manually.
Google Chrome Settings:
As you might already know Chrome has the worst image among the users about memory consumption. Google chrome eats way too much RAM. Even 8 GB RAMs cannot find an escape.
Select “Privacy and security” “Use a prediction service to load pages more quickly” Disable it.
Go to “System” “Continue running background apps when Google Chrome is closed” Disable it.
Antivirus Software:
If you are running any high-spec antivirus program; then this may also lead you to lag. Because malware detecting software has continuously keep scanning the whole system. Try to uninstall it; if not much threatening from the virus is there. Try using some online software to bring minimal space usage. Try keeping your Windows defender up to date.
Change File Explorer Options
Open File Explorer; go to “View” “Options”.
Jump to “Search”
Disable “Include compressed files (ZIP, CAB…)”
Disable “Always search file names and contents”
Click on “Apply”.
This may help you to boost system speed and free up the Disk space.
Windows Update Service:
So, are you tired of those irritating Update Windows pop-ups? Yes, they can be the same irritating to your RAM also. So, the easiest idea is to disable them.
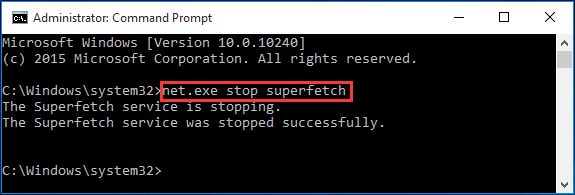
Super fetch can be the silent and mild poison for your system. Actually it was designed to be helpful in fast booting and enhance efficiency. But it’s also a RAM hungry tool. So, we’ll have to give it some rest.
Press “Win + X” “Command Prompt ” “Run as Admin”
Type “net.exe stop superfetch” hit the Enter key.
This might take a few minutes, so be patient.
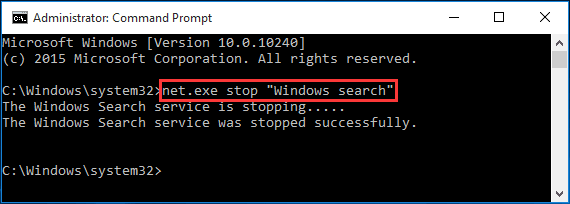
Disable Windows Search:
Windows Search was initialized to make the user’s work easy and quick. However, most users rarely or never use it. What it does is to locate the files and folders as per needs. But at the same time, it keeps running in the background and decreases RAM speed. So, we’ll also disable it. As windows search is a system tool you can’t just uninstall or delete it. It will come back and start working as usual after every new startup.
“Win + X” “Command Prompt ” “Run as admin”.
Now type – net.exe stop “Windows search”.
Setting Virtual Memory:
Now you know what RAM and ROM mean. So, in the modern era of computing, an idea has been introduced; that is virtual memory. It is basically a part of your ROM which has been lent to RAM for limited period. When your CPU feels like out of available RAM addresses; it borrows some of them from the hard drive. This is technical manner is called as Virtual memory. When not enough RAM is available to perform a process, Windows will temporarily store intermediate results in virtual memory, and then move them back to RAM afterward. But at the same time, the size of Virtual memory also needs to be looked after.
Press “Win + Pause”
Go to “System” “Advanced system settings”
Go to the “Advanced” “Settings”
Again jump to the “Advanced” tab “Change…” in the Virtual memory
Disable “Automatically manage paging file size for all drives”
Set Virtual memory as per requirements; anything around (8* 1.5) = 12 GB (12288 MB) RAM works for you. It is also ideal and recommended one.
So, let’s hope that after making these many changes; your system speed will be boosted up. The Disk usage will also come down to optimal. If that happens “Cheers”. Hope you found this stuff helpful and enjoyed it. Meet you again right at here. Till then Good Bye and Have a nice day!
What is Fast User Switching on Windows? A feature provided by Windows that lets its users switch between user accounts on a single PC. It is implemented within Windows XP Home Edition and Windows XP Professional. This feature is implemented without even logging out one account. This helps one of the users to let other…
Before I start telling you fixes of solving INET_E_RESOURCE_NOT_FOUND on edge, let me tell what this error is? Basically it is a common error which results in prevention of loading of internet pages and it is another problem which happens after updating Windows. This problem is faced by other web browsers also but Microsoft edge…
Capturing your special moments have always fascinated us and that is the reason why we have come up with this topic. Many people have their hobby of clicking pictures and photography. We take many pictures every day of our loved ones, our pets, and our favorite toys. We try to make memories more and more…
When you open the in-built camera app in Window, it may show you this error message “We can’t find your camera”. Check to be sure it’s connected and installed correctly, that it isn’t blocked by antivirus software and that your camera drivers are up to date” with the error code 0xA00F4244. Here in this article,…
What is MAC address? A Mac or Media Access Control address which is assigned to a network interface controller is a unique identifier. Mac addresses are linked to the hardware of network adapters. Mac addresses are used in the sub layer of the data link layer. Mac address sometimes referred to as burned-in-address or Ethernet…
The WMI Provider Host process(wmiprvse.exe) is an Official Windows System process, responsible for allowing third-party applications to request System information. Normally, it doesn’t use much of CPU but if another process is not responding or creating a problem then it may use a very high amount of CPU. In this article, we will know all…